Verilator
DUT Files(Device under test)
/****** alu.sv ******/
typedef enum logic [1:0] {
     add     = 2'h1,
     sub     = 2'h2,
     nop     = 2'h0
} operation_t /*verilator public*/;

module alu #(
        parameter WIDTH = 6
) (
        input clk,
        input rst,

        input  operation_t  op_in,
        input  [WIDTH-1:0]  a_in,
        input  [WIDTH-1:0]  b_in,
        input               in_valid,

        output logic [WIDTH-1:0]  out,
        output logic              out_valid
);

        operation_t  op_in_r;
        logic  [WIDTH-1:0]  a_in_r;
        logic  [WIDTH-1:0]  b_in_r;
        logic               in_valid_r;
        logic  [WIDTH-1:0]  result;

        // Register all inputs
        always_ff @ (posedge clk, posedge rst) begin
                if (rst) begin
                        op_in_r     <= '0;
                        a_in_r      <= '0;
                        b_in_r      <= '0;
                        in_valid_r  <= '0;
                end else begin
                        op_in_r    <= op_in;
                        a_in_r     <= a_in;
                        b_in_r     <= b_in;
                        in_valid_r <= in_valid;
                end
        end

        // Compute the result
        always_comb begin
                result = '0;
                if (in_valid_r) begin
                        case (op_in_r)
                                add: result = a_in_r + b_in_r;
                                sub: result = a_in_r + (~b_in_r+1'b1);
                                default: result = '0;
                        endcase
                end
        end

        // Register outputs
        always_ff @ (posedge clk, posedge rst) begin
                if (rst) begin
                        out       <= '0;
                        out_valid <= '0;
                end else begin
                        out       <= result;
                        out_valid <= in_valid_r;
                end
        end

endmodule;
SystemVerilog to C++ conversion
- command:
verilaort --cc alu.sv--cc: converts to C++- besides, you can also converts to SystemC by using
--sc
- besides, you can also converts to SystemC by using
- result:
$ ls ./obj_dir Valu.cpp Valu__Syms.cpp Valu___024root__DepSet_h7172bd91__0.cpp Valu___024root__DepSet_ha59b247d__0__Slow.cpp Valu___024unit__DepSet_h45503383__0__Slow.cpp Valu__verFiles.dat Valu.h Valu__Syms.h Valu___024root__DepSet_h7172bd91__0__Slow.cpp Valu___024root__Slow.cpp Valu___024unit__Slow.cpp Valu_classes.mk Valu.mk Valu___024root.h Valu___024root__DepSet_ha59b247d__0.cpp Valu___024unit.h Valu__ver.d - explanation:
.mk.h/.cpp: contains our C++ headers and implementation sourcesValu.h: the primary design header contains the converted "ALU" class definitionValu___024uint.h: an internal header for the "ALU" class
Designing a basic Verilator testbench
- an example:
#include <stdlib.h> #include <iostream> #include <verilated.h> #include <verilated_vcd_c.h> #include "Valu.h" #include "Valu___024unit.h" #define MAX_SIM_TIME 20 vluint64_t sim_time = 0; int main(int argc, char** argv, char** env) { Valu *dut = new Valu; Verilated::traceEverOn(true); VerilatedVcdC *m_trace = new VerilatedVcdC; dut->trace(m_trace, 5); m_trace->open("waveform.vcd"); while (sim_time < MAX_SIM_TIME) { dut->clk ^= 1; dut->eval(); m_trace->dump(sim_time); sim_time++; } m_trace->close(); delete dut; exit(EXIT_SUCCESS); } - explanation:
include<verilated.h>: access common Verilator routines<verilated_vcd_c.h>: write waveforms to a VCD(value change dump) file"Valu.h": top class of Verilated ALU module"Valu___024unit.h": a Verilated version of out typedef enumeration
main:- instantiates ALU module
- set up the waveform dumping:
dut -> trace(m_trace, 5):5simply limits the depth of the trace to 5 levels down the dut
whileloop:- update the state
- re-eval
- dump
Building the simulation executable
[!note] Verilator Unlike some other simulators, the Verilator application is not used to simulate the testbench. Instead, the Verilator application is only used for converting Verilog to C++ and create build instructions for
Make. The simulator in this case is the C++ testbench itself.
- command to build the simulation executable:
verilator --Wall --trace --build -cc alu.sv --exe tb_alu.cpp:--Wall: just likeWallin gcc--trace: enable waveform tracing--build: build module executable after verilation
Run the testbench
- just run the executable:
./obj_dir/Valu- and then it will generate waveform file
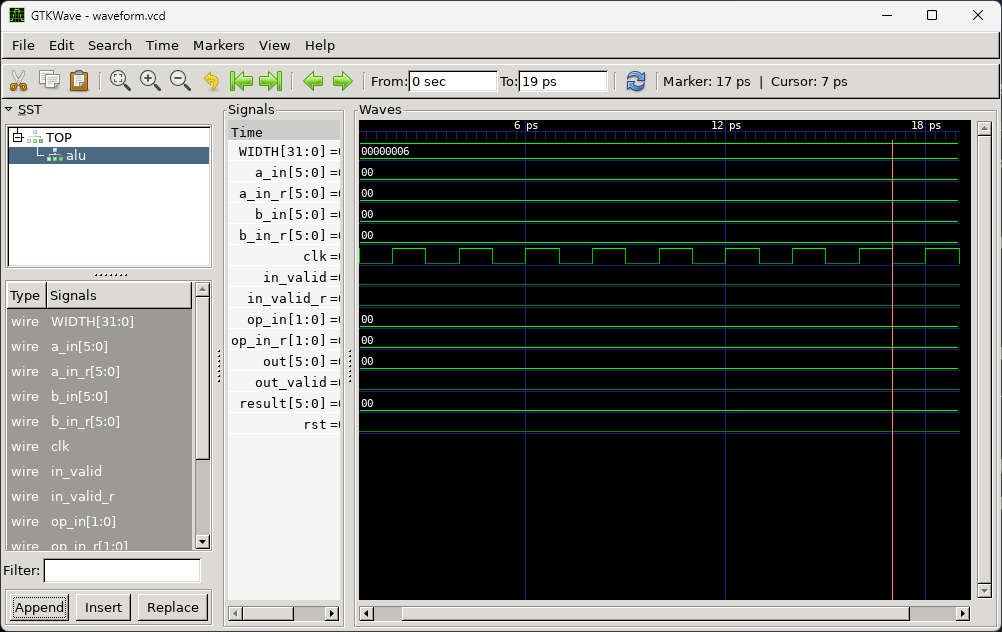
Viewing Verilator waveforms
- open the waveform dump file via
GTKWave:
Observations
- the simulation does not have any
xorunknownvalues- Verilator is a two state simulator, and by defalut, all signals are initialezed to
0 - this is great for speed, bu not accurate
- Verilator is a two state simulator, and by defalut, all signals are initialezed to
1psis the default timescale for Verilator, but it does not signify any particular value of time